How to build a Crypto Payment Gateway with Fystack Programmable Wallet Infrastructure (Part 1)

Every crypto payment gateway solves the same problem: generate a deposit address per user, detect when funds arrive, and sweep everything into a central wallet you control. Most teams spend months wiring this up across multiple chains, managing private keys, monitoring blocks, handling reorgs, building consolidation jobs.
The Fystack SDK handles all of it. You create wallets, get deposit addresses across EVM chains, Solana, and Tron, and configure automatic sweep tasks that consolidate funds into your hot wallet. No private key management. No block monitoring code. This tutorial walks through building a production-ready payment gateway from scratch.
By the end you'll have: per-user wallets with multi-chain deposit addresses, automatic fund consolidation via sweep tasks, real-time webhook notifications, and withdrawal capabilities, all in under 200 lines of TypeScript.
Architecture Overview
The payment flow has six steps:
- Your application calls the Fystack SDK to create a wallet per user
- Fystack generates deposit addresses for each wallet across supported blockchains (Ethereum, Solana, Tron, Bitcoin)
- Users deposit funds to their assigned address on any supported chain
- Sweep tasks auto-consolidate funds from user wallets into your central hot wallet when balances exceed a USD threshold
- Consolidated funds land in your hot wallet, ready for settlement
- Withdrawals/payouts send funds to merchants, users, or external addresses
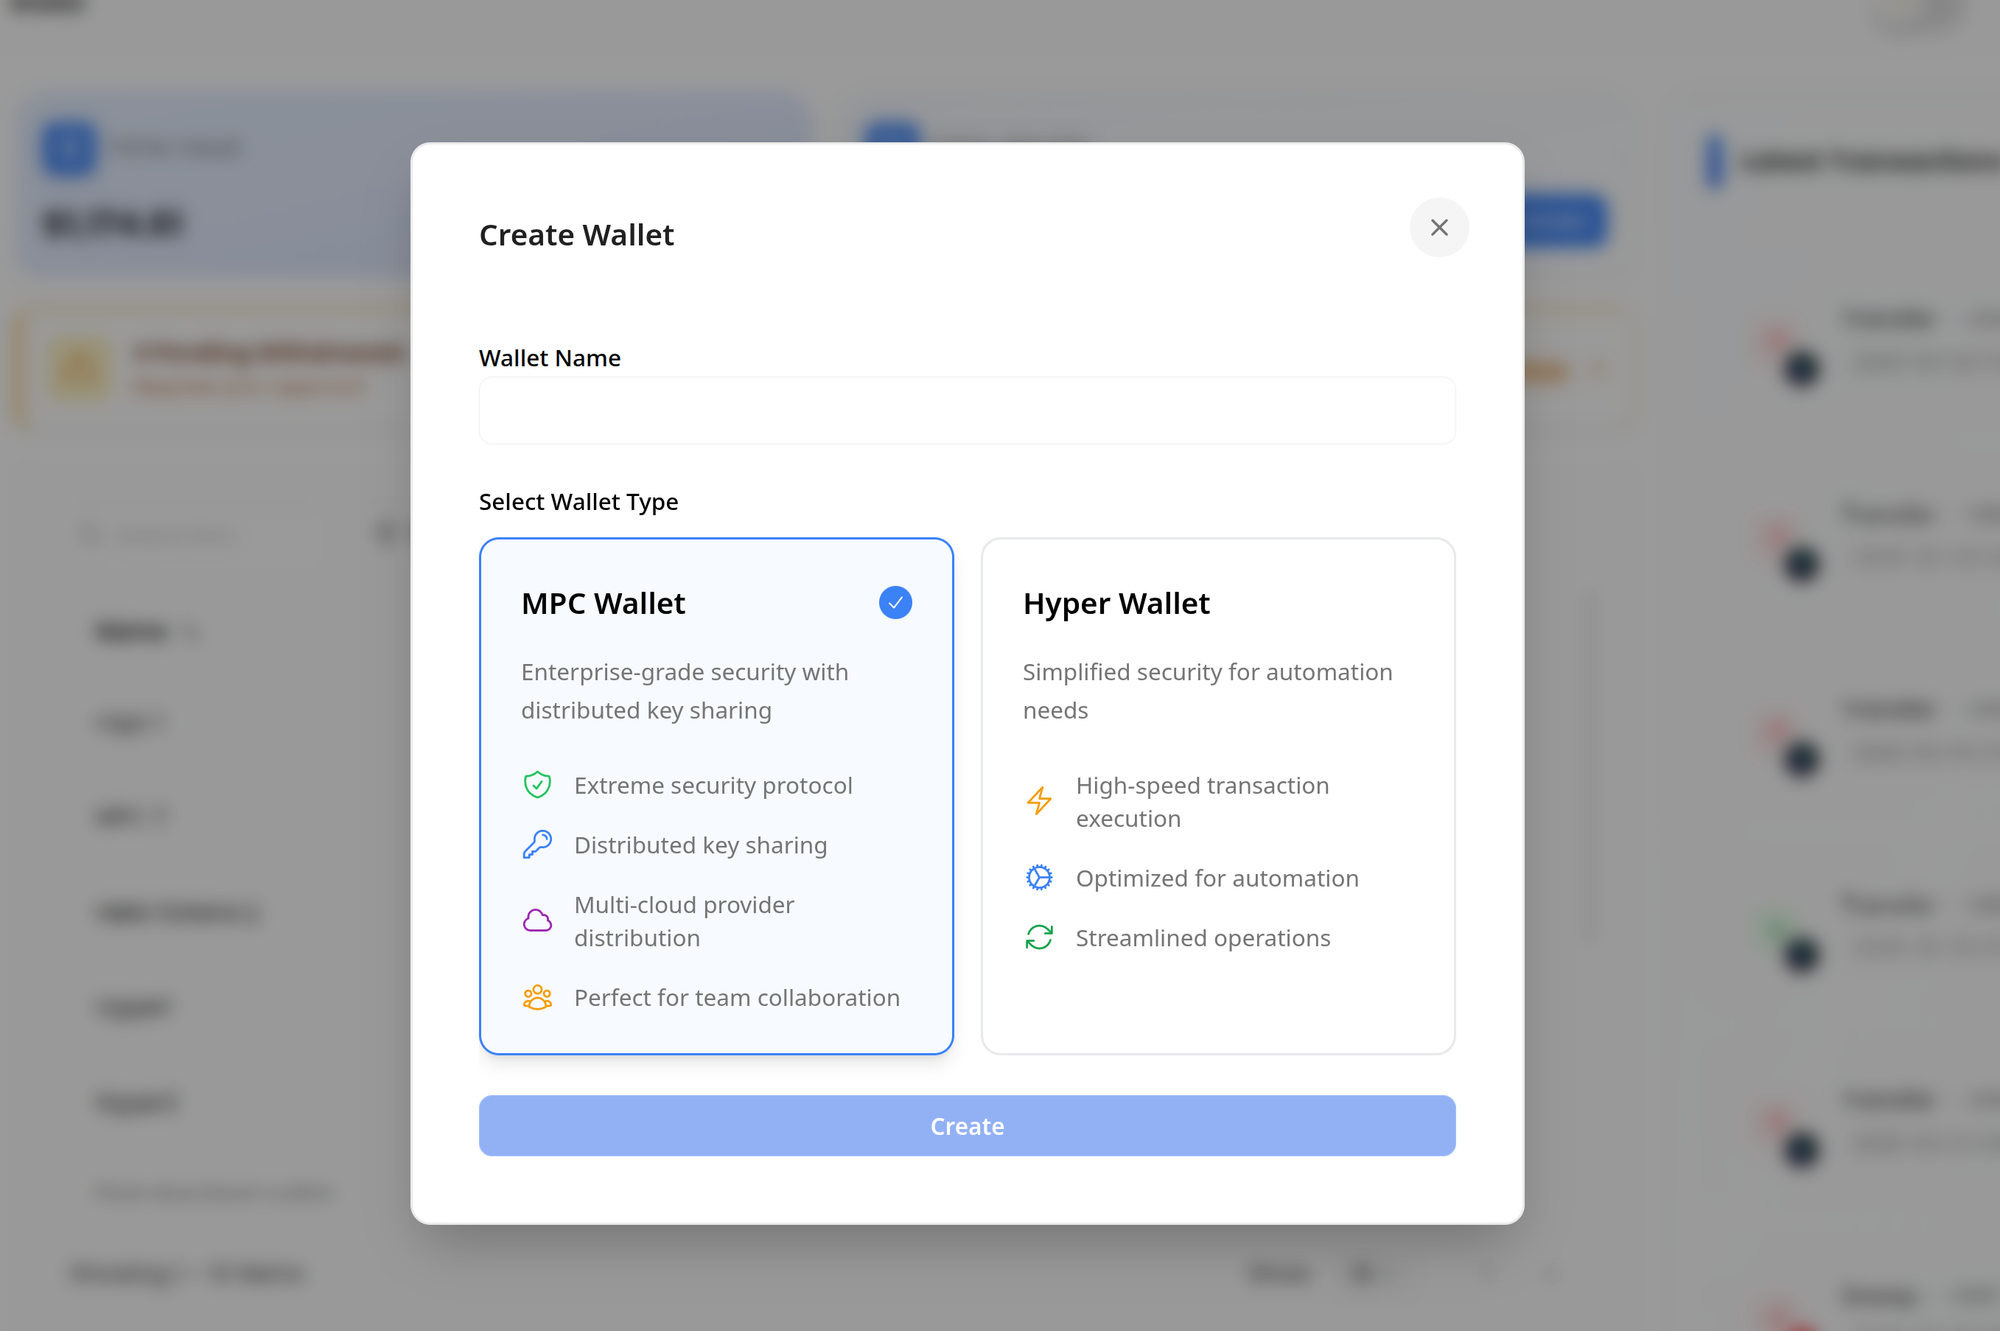
The SDK abstracts away private key management entirely. Wallets use either Hyper wallets (HD-derived, instant creation) for high-volume user wallets or MPC wallets (threshold signatures across distributed nodes) for your hot wallet. In both cases, you never touch a private key.

Prerequisites
- Node.js 22+
- A Fystack account with API credentials (sign up at fystack.io) and create a workspace
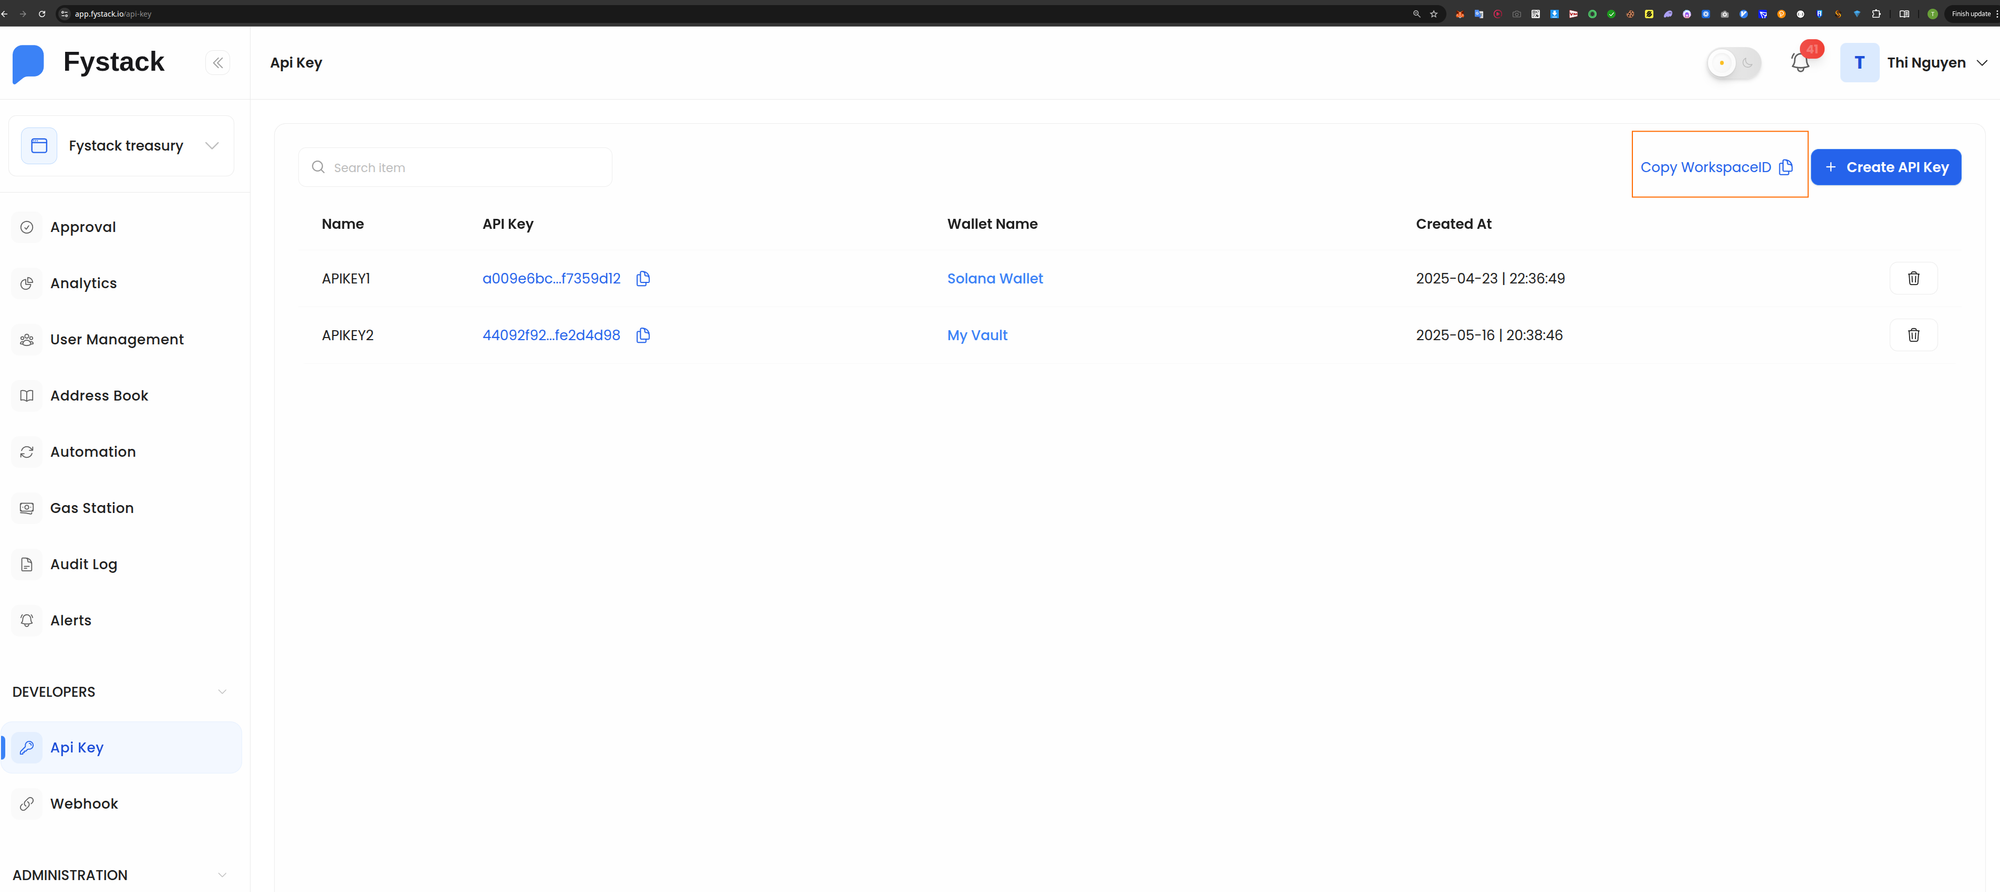
- Your workspace ID (visible in the Fystack dashboard -> API Keys -> Copy workspaceID)
Step 1: Install and Configure the SDK
npm install @fystack/sdk
Create a .env file with your credentials:
FYSTACK_API_KEY=your-api-key
FYSTACK_API_SECRET=your-api-secret
FYSTACK_WORKSPACE_ID=your-workspace-uuid
HOT_WALLET_ID=your-hot-wallet-uuid
Initialize the SDK:
import {
  FystackSDK,
  Environment,
  WalletType,
  WalletPurpose,
  AddressType,
} from "@fystack/sdk";

const sdk = new FystackSDK({
  credentials: {
    apiKey: process.env.FYSTACK_API_KEY!,
    apiSecret: process.env.FYSTACK_API_SECRET!,
  },
  environment: Environment.Production,
  workspaceId: process.env.FYSTACK_WORKSPACE_ID!
});
Every API call is authenticated via HMAC-SHA256. The SDK handles signing automatically, you provide the key and secret, and it constructs the ACCESS-API-KEY, ACCESS-TIMESTAMP, and ACCESS-SIGN headers on each request.
Step 2: Create a Hot Wallet (Your Treasury)
Before creating user wallets, you need a central hot wallet where funds will be consolidated. Use an MPC wallet for this, it splits the private key across multiple nodes so no single server holds the full key.
const hotWallet = await sdk.createWallet(
  {
    name: "Treasury Hot Wallet",
    walletType: WalletType.MPC,
    walletPurpose: WalletPurpose.General,
  },
  true // Wait for creation to complete (MPC wallets take 10-30s)
);

console.log("Hot wallet ID:", hotWallet.wallet_id);
// Save this ID — you'll reference it when creating user wallets
MPC wallet creation is asynchronous because the distributed key generation (DKG) protocol runs across multiple nodes. The true parameter tells the SDK to poll until the wallet status transitions from pending to success.
You can also create a hot wallet manually through Fystack portal
Step 3: Create a sweep task to consolidate deposits to a hot wallet
Before you can consolidate fund from depoist walelt to central hot wallet you need to createa a sweep task
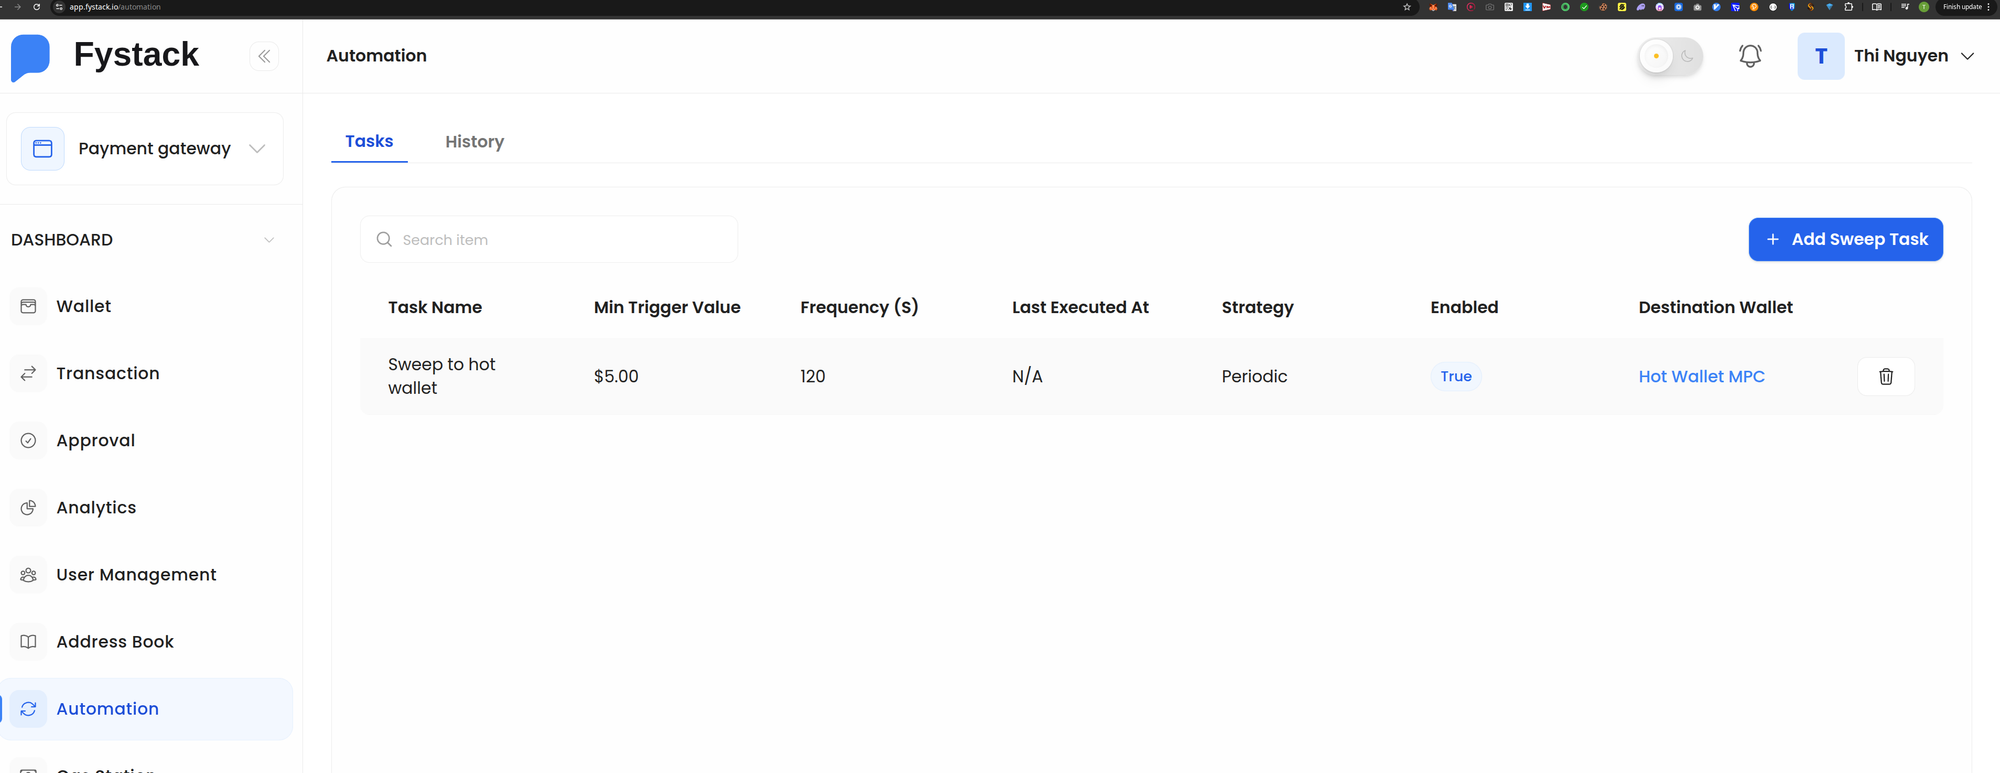
Visit fystack portal https://app.fystack.io/ -> Automation -> Add sweep task
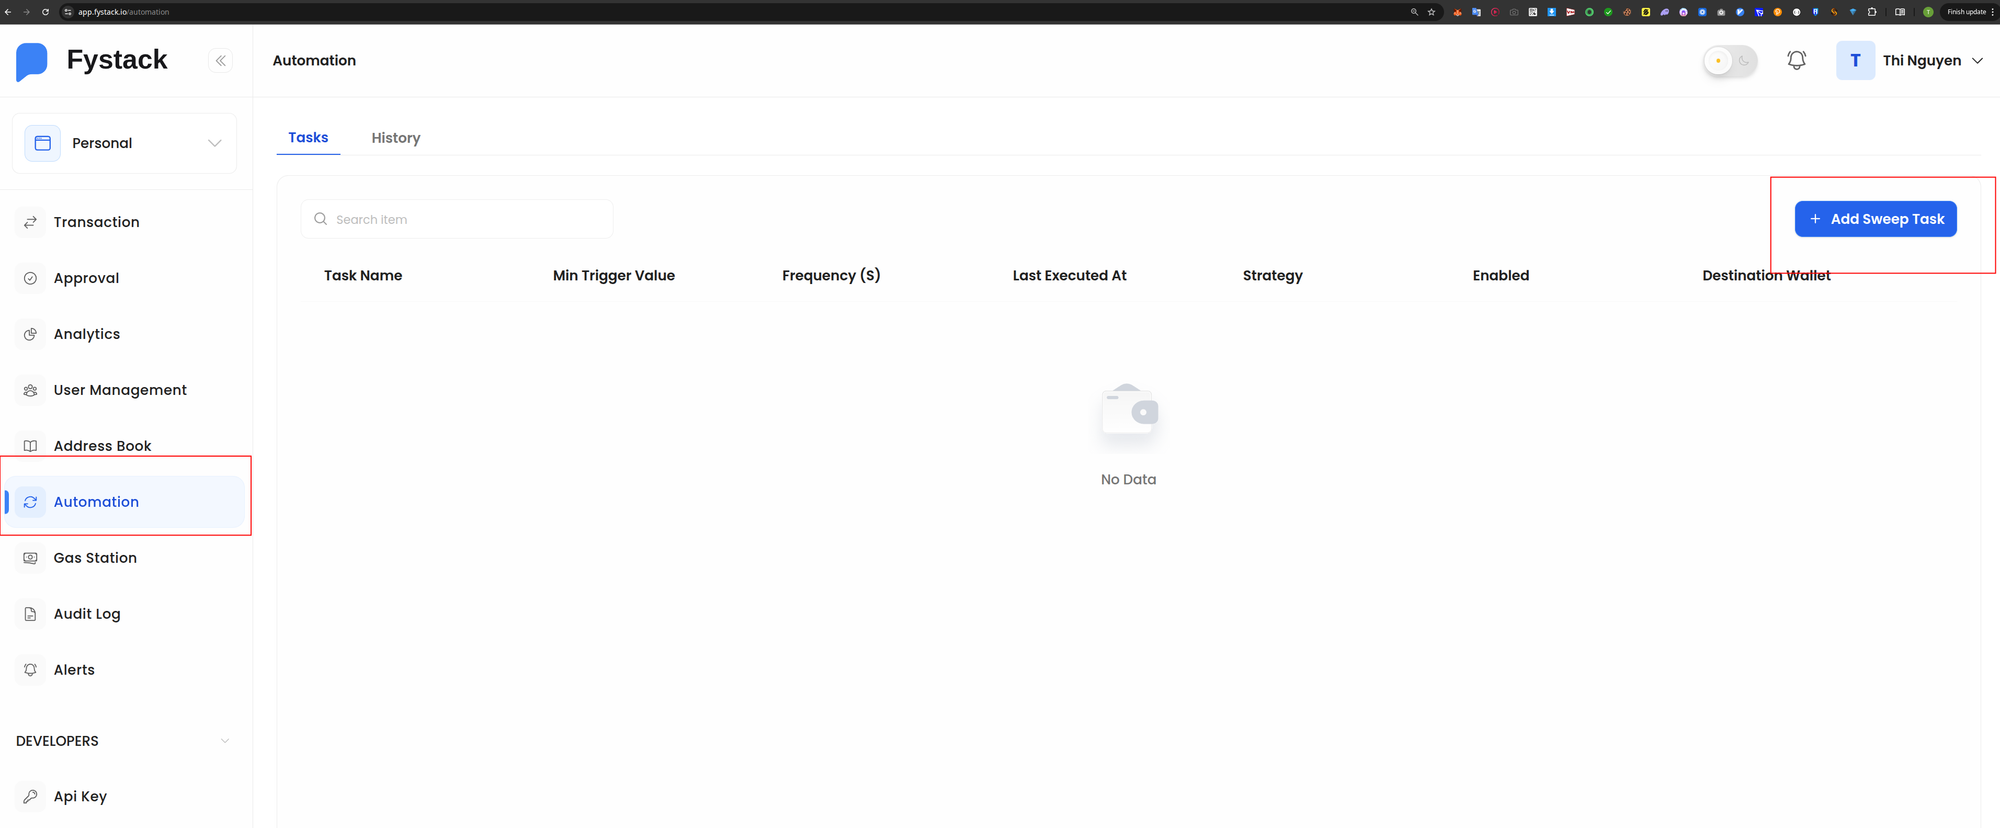
Specify the task name -> For payment gateway use case you don't need to choose source wallet yet, sweep task can be binded to source wallets (deposit wallets) later
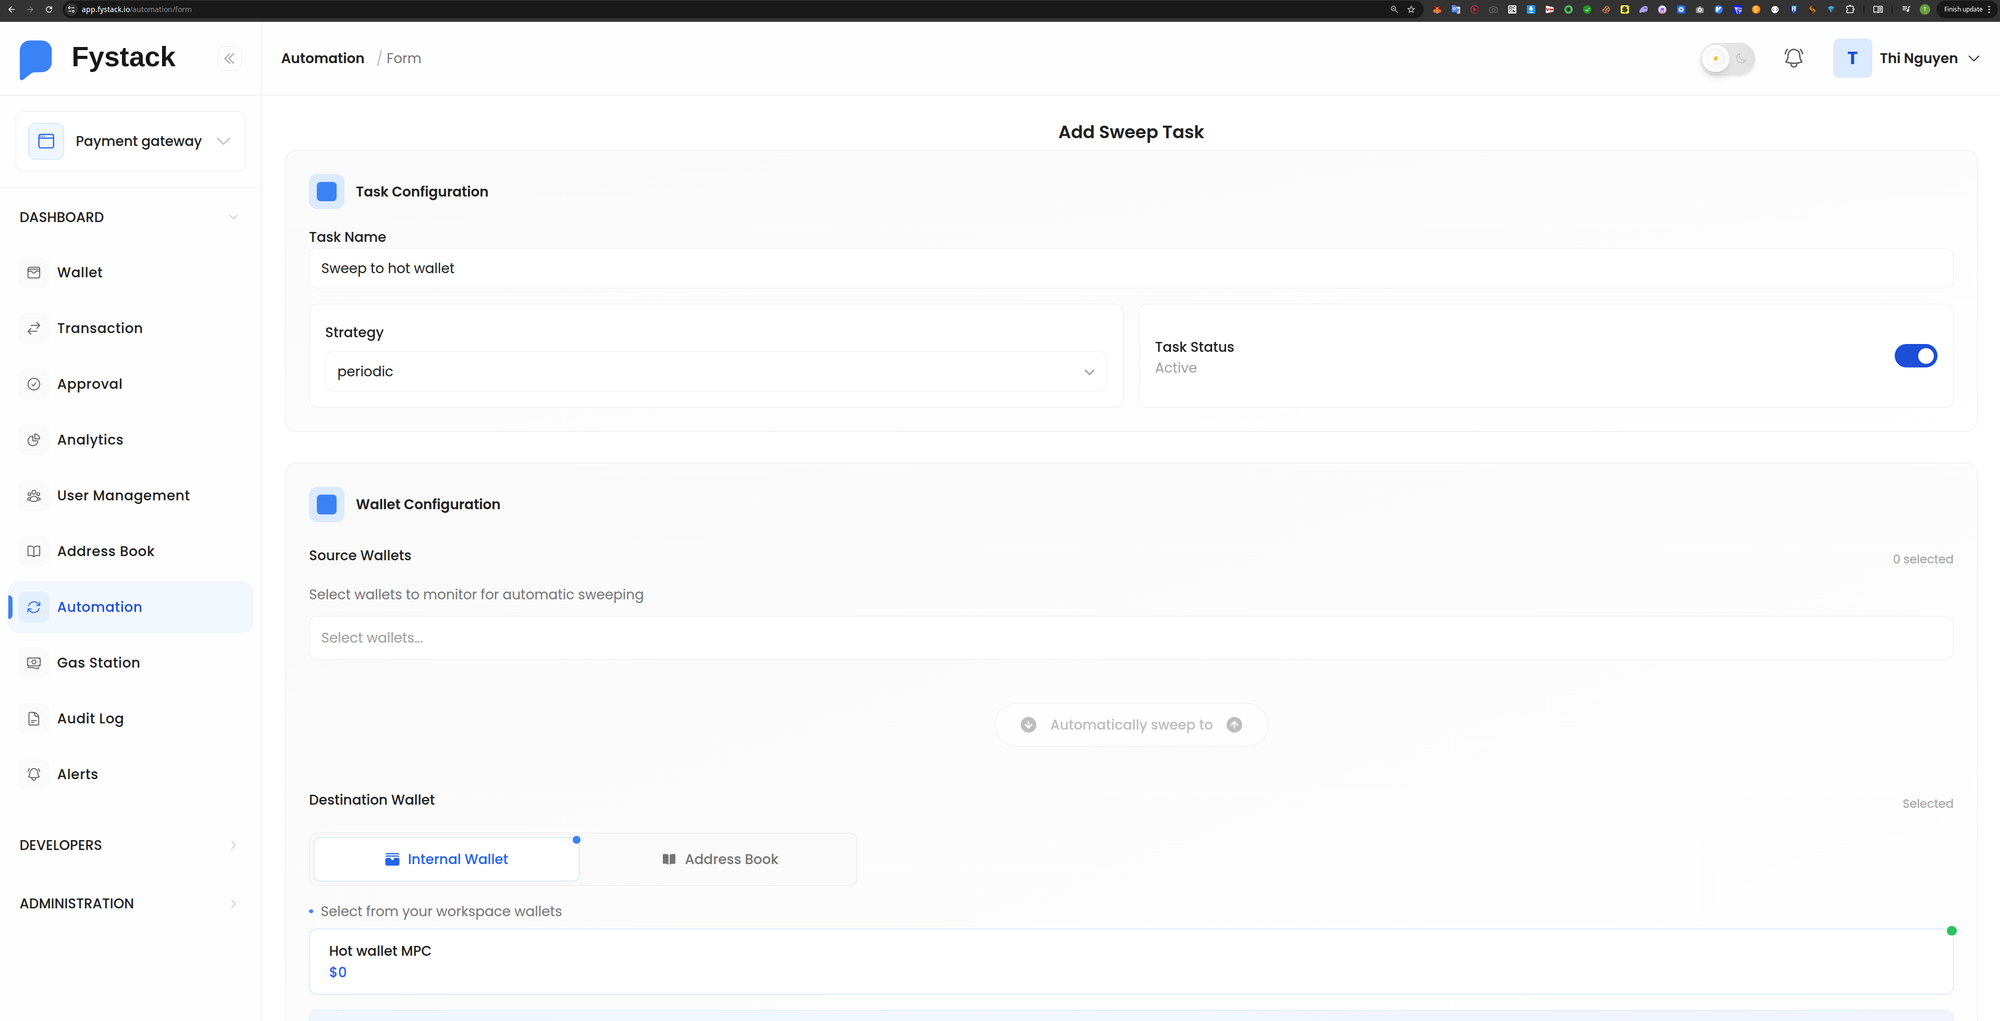
Specify the destination wallet which. In this tutorial we chose Hot wallet MPC which is an MPC wallet we created earlier
Update min trigger value (USD) -> Create automation task
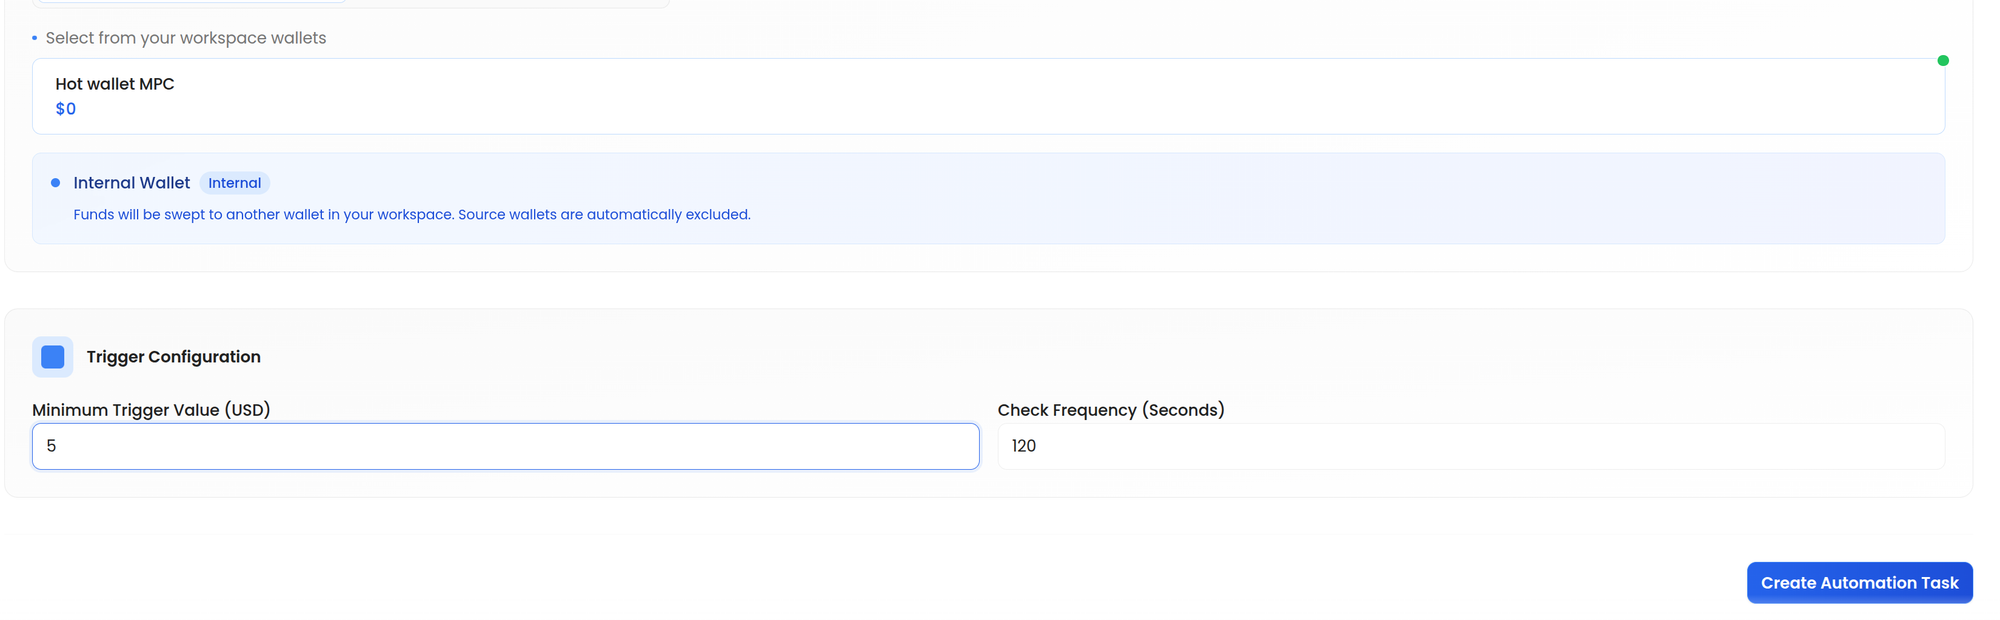

Now you can click on the created sweep task , copy the sweep task ID which is the last segment of the URL
Step 4: Create Per-User Wallets with Auto-Sweep
When a user signs up or initiates a payment, create a dedicated wallet. Use Hyper wallets (standard HD-derived) for user wallets , they create instantly and are ideal for high-volume generation.
The key detail: attach a sweep task at creation time. This tells Fystack to automatically move funds from the user wallet to your hot wallet once the balance exceeds a threshold defined in the sweep task.
async function createUserWallet(userId: string) {
  const wallet = await sdk.createWallet(
    {
      name: `user_${userId}`,
      walletType: WalletType.Hyper,
      walletPurpose: WalletPurpose.OneTimeUse,
      sweepTaskID: '6bdc8e47-dc1a-4416-9158-b99cdc23205a' // the sweep task ID we got in step 3
    },
    true
  );

  return wallet;
}

// Usage
const wallet = await createUserWallet("usr_abc123");
console.log("Wallet ID:", wallet.wallet_id);
console.log("Status:", wallet.status); // "success"
OneTimeUse Wallets and Full Balance Sweep
For payment flows, most deposit wallets are used only once per payment or per invoice. In this case, you can set the wallet purpose to OneTimeUse.
When a wallet is marked as OneTimeUse, the sweep system will try to maximize the sweep amount and empty the wallet completely, instead of leaving a small native token balance for future gas fees.
Normally, reusable wallets keep a small dust amount (e.g. ETH, SOL, TRX) to pay gas for future sweep transactions. But for OneTimeUse wallets, the system assumes the wallet will not be used again, so it attempts to consolidate all funds into the hot wallet.
This is especially useful for:
- Payment invoices
- One-time deposits
- Checkout sessions
- Temporary user wallets
This prevents funds from being stranded as small dust balances across thousands of deposit wallets.
Step 5: Get Multi-Chain Deposit Addresses
Each wallet supports multiple blockchains. Request deposit addresses for the chains your users need:
async function getDepositAddresses(walletId: string) {
  // EVM address — works for Ethereum, Polygon, Arbitrum, Optimism, Base
  const evm = await sdk.getDepositAddress(walletId, AddressType.Evm);

  // Solana address
  const sol = await sdk.getDepositAddress(walletId, AddressType.Solana);

  return {
      address: // "0x742d35Cc..."
      qr_code:  // Data URL for QR image
    },
  };
}
One wallet, multiple chains. The same wallet ID maps to different blockchain addresses depending on the AddressType:
| AddressType | Chains Covered | Address Format |
|---|---|---|
evm |
Ethereum, Polygon, Arbitrum, Optimism, Base | 0x... (same address across all EVM chains) |
sol |
Solana | Base58 public key |
tron |
Tron | T... |
btc |
Bitcoin | bc1q... (Native SegWit - P2WPKH) |
Display to Users
In your payment UI, show the deposit address and QR code for the user's selected chain:
app.get("/api/payment/:userId/address", async (req, res) => {
  const { userId } = req.params;
  const { chain } = req.query; // "evm" or "solana"

  const wallet = await getOrCreateWallet(userId);
  const addressType = chain === "solana" ? AddressType.Solana : AddressType.Evm;
  const deposit = await sdk.getDepositAddress(wallet.wallet_id, addressType);

  res.json({
    address: deposit.address,
    qrCode: deposit.qr_code,
    chain,
  });
});
Step 6: Listen for Deposits with Webhooks
Fystack sends webhook events when deposits are detected and confirmed. Set up an endpoint to receive them.
Webhook Events
| Event | When | Use For |
|---|---|---|
deposit.pending |
Transaction detected on-chain, not yet confirmed | Show "payment pending" UI |
deposit.confirmed |
Transaction confirmed on the blockchain | Credit the user's account |
withdrawal.pending |
Withdrawal request created | Update internal records |
withdrawal.confirmed |
Withdrawal transaction confirmed | Mark payout as complete |
withdrawal.failed |
Withdrawal transaction failed | Alert ops team, retry |
Verify Webhook Signatures
Every webhook request includes an x-webhook-signature header - an Ed25519 signature over the canonicalized JSON payload. Always verify before processing.
import crypto from "crypto";

// Fetch your workspace's webhook verification key (do this once, cache it)
const { public_key } = await sdk.getWebhookPublicKey(
  process.env.FYSTACK_WORKSPACE_ID!
);

app.post("/webhook/fystack", async (req, res) => {
  const signature = req.headers["x-webhook-signature"] as string;
  const event = req.headers["x-webhook-event"] as string;
  const payload = req.body;

  // Canonicalize: sort keys recursively, then stringify
  const canonical = JSON.stringify(sortKeysDeep(payload));

  // Verify Ed25519 signature
  const isValid = crypto.verify(
    null,
    Buffer.from(canonical),
    {
      key: Buffer.from(public_key, "base64"),
      format: "der",
      type: "spki",
    },
    Buffer.from(signature, "base64")
  );

  if (!isValid) {
    return res.status(401).json({ error: "Invalid signature" });
  }

  // Process the event
  switch (event) {
    case "deposit.confirmed":
      await handleDepositConfirmed(payload);
      break;
    case "withdrawal.confirmed":
      await handleWithdrawalConfirmed(payload);
      break;
    case "withdrawal.failed":
      await handleWithdrawalFailed(payload);
      break;
  }

  res.status(200).json({ received: true });
});

function sortKeysDeep(obj: any): any {
  if (Array.isArray(obj)) return obj.map(sortKeysDeep);
  if (obj && typeof obj === "object") {
    return Object.keys(obj)
      .sort()
      .reduce((acc: any, key) => {
        acc[key] = sortKeysDeep(obj[key]);
        return acc;
      }, {});
  }
  return obj;
}
The canonicalization step matters. Different JSON serializers produce different string representations of the same data. Sorting keys recursively before verification ensures consistent results.
So far, we’ve covered wallet creation, deposit address generation, sweep automation, and webhook handling. These components form the core infrastructure required for accepting crypto payments across multiple blockchains.
In Part 2, we’ll go deeper into withdrawals, treasury management, gas funding, idempotent webhook processing, and how to design a production-grade payment gateway architecture.
Have questions about your custody setup? Share what you are building via the form and explore how Fystack’s MPC wallets, and sweep engine fit your architecture.
Not ready yet? Join our Telegram for product updates and architecture discussions: https://t.me/+9AtC0z8sS79iZjFl